Winter Riding Explained

Probably the most frequent question I get asked is how I manage to stay warm riding outside in the winter. Riding in the cold can be intimidating. It seems as if it is prohibitively expensive to buy all the gear “required” to stay warm when it’s cold and grey outside. With some strategic layering and a couple key purchases you can stay warm and enjoy winter riding in Ohio! There are a couple items I will share below that really don’t have quality budget friendly options (at least not that I’ve found) BUT if you are willing to shop around and purchase used, the Facebook swap meets and sites like eBay or Poshmark can help you snag some of these items for a good price. I bought my winter riding shoes off the online swap meet for half of their original cost new and they are on season 3 of winter riding still going strong. In that case, the investment was totally worth it! Feel free to share any gear, tips and tricks I might have missed in the comments below! Disclaimer: These temps and layers are what work for me. I’m ALWAYS cold. They are a good starting place for you to add or remove layers as you figure out what works for you. And remember, if you’re doing a hard ride with lots of hills, you may want to dress for 25* even if the feels like is 14* because more effort means more heat production and less layers are needed. With so many layers, sometimes I feel like the kid in A Christmas Story!
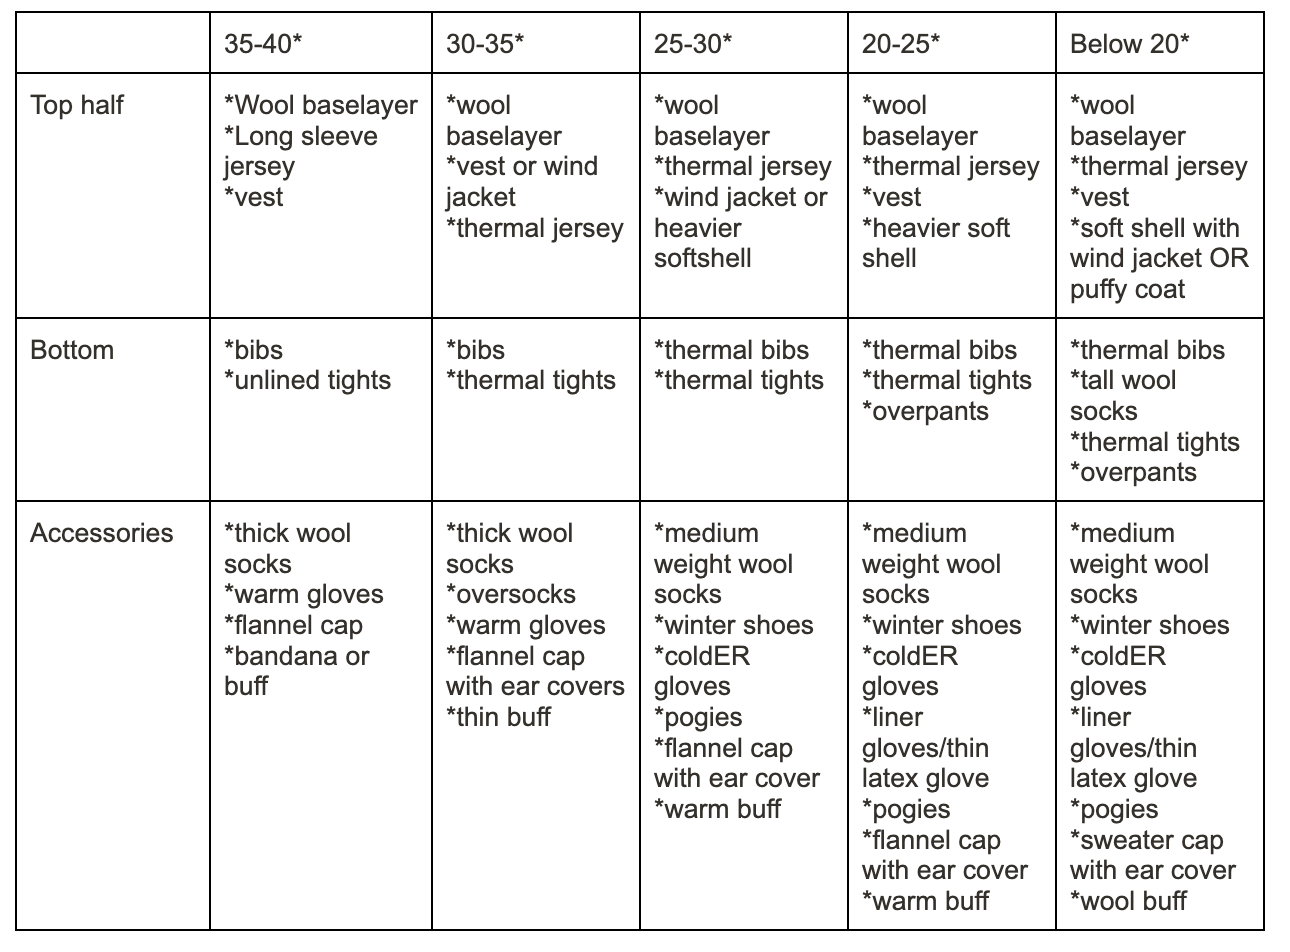
The first thing that is key to successful winter riding is layers. Base layers are the most important part of your outdoor clothing system.That system is made up of three layers: the outer shell for rain and snow protection, the middle insulation layer, and the-all important base layer on the inside. Some days, it’s 20* at the start of my ride but pushing 40* by the end. You want to make sure you have the ability to shed or add layers as you go because getting sweaty when it’s below freezing is definitely not a good thing. I like to throw a Donut Sack handlebar bag on the front of my bike during the winter to stash layers instead of trying to cram them in my pockets. The other really important thing to consider as you plan your outfit, is what level of effort you plan to put in and is it sunny or cloudy? The level of intensity coupled with the sun makes a HUGE difference in what I choose to wear, no matter the real feel temps. I’ve found it helpful to list what I wore and what the conditions were on my strava or my garmin notes so I can refer back to them as the winter goes on. Finally, if you’re not cold when you start, you’re overdressed. You will warm up. I promise. So if you’re comfy at the start, shed a layer now.
Let’s start with the top half of you. As I said above, the first layer should be a baselayer. This is either short sleeve or long sleeve depending on the temps. I prefer wool for my base. Merino wool is full of small air pockets. These trap air and keep you warm. If you’re too warm, the fibers relax and release the trapped air, cooling things down. This process still happens when the Merino is wet, maintaining your overall warmth. Wool is more expensive than other options, but I find I can wear my wool base layer 2-3 times before needing to be washed and I definitely can’t do that with acrylic! I purchased my wool baselayers from Poshmark used and was able to spend about $20 each which is WAY LESS than buying new. If you’re looking new, REI often has good sales and coupons you can use to help defray the cost. If wool doesn’t work for you or your budget, acrylic works too. I have one polyester top that is a thin layer that I layer under other things or when it’s a little warmer and another that is actually fleece lined acrylic that works for layering as well. I picked these up at a sporting goods store in the running section. Since it’s the base, color doesn’t matter, so anything you can find on clearance is even better! Another hack is to carry a large tyvek envelope folded up in your bag or pocket and slip that in under your jersey to help block wind. This envelope could also be cut up and used to boot a tire if you needed to! Other pieces that are helpful on the top half are a vest and a wind jacket. You don’t have to buy a cycling specific vest. The benefit to the cycling specific vest is that some of them come with pockets in the rear which makes easier access to snacks and your phone, but it’s not necessary. A softshell is great, but you don’t need cycling specific soft shells or jackets. You do want something that’s going to cover part of your rear when you get into the cycling position so something a little longer or something with a drop tail will be beneficial.
On the bottom, my base layer is a pair of regular bib shorts or if it’s really cold, thermal bib shorts or thermal bib knickers work too. On top of the bib shorts, I add varying layers of tights. It’s good to keep the chamois in contact with your body and wear the tights over. I personally hate leg warmers, but you might find they work for you and are a good option for layering in place of the thermal knickers I mention below. Wool ski socks can help simulate the thermal knickers when paired with your regular riding shorts and are another more budget friendly option. I have found a pair of over pants to be really helpful for winter riding. They are a softshell material with a light fleece lining and tapered legs. These could be a pair of hiking pants or cycling specific when you can find them. They allow you to be really flexible with your layering.

Your feet and your hands are the places I would absolutely spend my winter riding gear budget first. On my feet, I always have a pair of wool socks. I like to have varying weights of wool socks to account for varying temperatures. Anything down to 40*, if it’s dry, I will wear thick wool socks (think DeFeet Woolie Boolies) and my regular riding shoes. Between 35-40*, I will often stick with that same setup but add a pair of over socks. If it’s wet, or around/below freezing, I switch to my winter shoes. I have a pair of Japanther from 45NRTH for winter riding and they are worth EVERY PENNY. They are truly waterproof so my feet stay warm and dry through any unexpected puddles or creek crossings which you always have to be ready for on Ohio gravel in the winter. I haven’t really found a budget replacement for a good pair of winter riding shoes. Anything we’ve tried over the years that has been cheaper, including shoe covers, just isn’t warm enough. Shoe covers don’t stay on when you’re walking in them, and sometimes due to ice or steep hills, you’re walking. In addition, they aren’t truly waterproof so my feet end up cold and wet. 45NRTH, Lake, and Bontrager Old Man Winter shoes make the best winter riding shoes we’ve found. If you can’t find a pair of winter riding shoes in your budget, there are a couple of other options. Toe warmer heat packs stick to the top of your feet and help keep you warm. After you have your socks on, put a plastic bag or aluminum foil over your feet to help keep the wind out. You can also tape over the ventilation in your shoes for the winter. This is a time I would absolutely have wool socks on because taping over ventilation stops moist air from escaping and can lead to wet feet which are cold feet. Finally, another budget option is to throw flats on your bike for the winter and ride in a pair of winter hiking boots. Wool socks and winter hiking boots are something you may already own and will keep you warm and dry through the winter.
Cold hands and feet ruin a ride faster than anything. For your hands, pogies are amazing. If you ride flat bars, I recommend the Wolf Tooth pogies. They are super easy to install and use. They leave room for adding hand warmer heat packs if it’s really cold and also are a good place to keep your snacks warm and not frozen. For drops, I prefer the 45NRTH Draugenklaw pogies. Easy to install and they allow your hands to stay warm and cozy while blocking the wind. With both of these options, I wear the regular thin Handup Glove mountain bike gloves down to around 20*. Below 20* and I wear the Handup Glove cold weather glove with the pogies. The negative for some people with the drop bar pogies, is that they don’t allow you to move your hands. You are locked in that one position on the hoods and you’re unable to use the drops. If you don’t want to mess with pogies, there are varying levels of gloves out there to choose from. Handup Gloves make a coldER glove that has some wind protection on the back of your hand, a synthetic leather palm and fleece lining. These are good for me without pogies, to about 35*. 25-30*, I have a pair of ski gloves I purchased from REI a few years ago. They are waterproof neoprene, flexible, and have a nice fleece lining. They are grippy enough to maintain control of the bars but thin enough that I feel like I can still control the shifting and braking. You could easily add a pair of latex gloves underneath or liner gloves underneath and be comfortable probably down to the mid teens. I have tried lobster gloves but don’t love them for drop bar riding because I don’t feel like I can easily shift or brake with them. You can always put the toe warmer patches on the back of your hands to help keep you warm. If you do have the Donut Sack bag or another handlebar bag, you can sometimes move your hands in on the bars and use the bag to block the wind. Leather palms on gloves help to insulate your hands from a cold aluminum bar and keep you warmer in the long run.
Other accessories that I find helpful for winter riding are buffs and cycling caps with ear coverings. I like a wool or flannel cap with a knit or sweater type ear covering. Mine are from Ellum Bag Works and Rothera. I prefer a cycling cap as opposed to a knit cap you already own because it fits better under your helmet. Buffs or bandanas are great to block wind from your neck and from going down your jersey or top layer. These can be found at sporting goods stores really easily. I like a pair of clear lens sunglasses to help keep the wind out of my eyes. If it’s super cold, ski goggles work well also. You may find it helpful to purchase a liner for your helmet or even a warmer, dedicated winter helmet. Insulated bottles filled with hot water and apple cider or tea or something similar is really nice and helpful. When it’s cold, we often forget to drink but you still get dehydrated in the cold. If you don’t have a thermal bottle, turn your bottle upside down in your cages to keep the liquid down in the lid to keep your cap from freezing. You can also use a hydration backpack with an insulated sleeve for the hose to keep it from freezing.
Winter riding can feel intimidating and you definitely have to add extra time to get ready but the scenery in the winter can be especially gorgeous and allow you to see things you don’t get to see in the summer. So invest in a few key pieces, grab a friend, and head on out there!